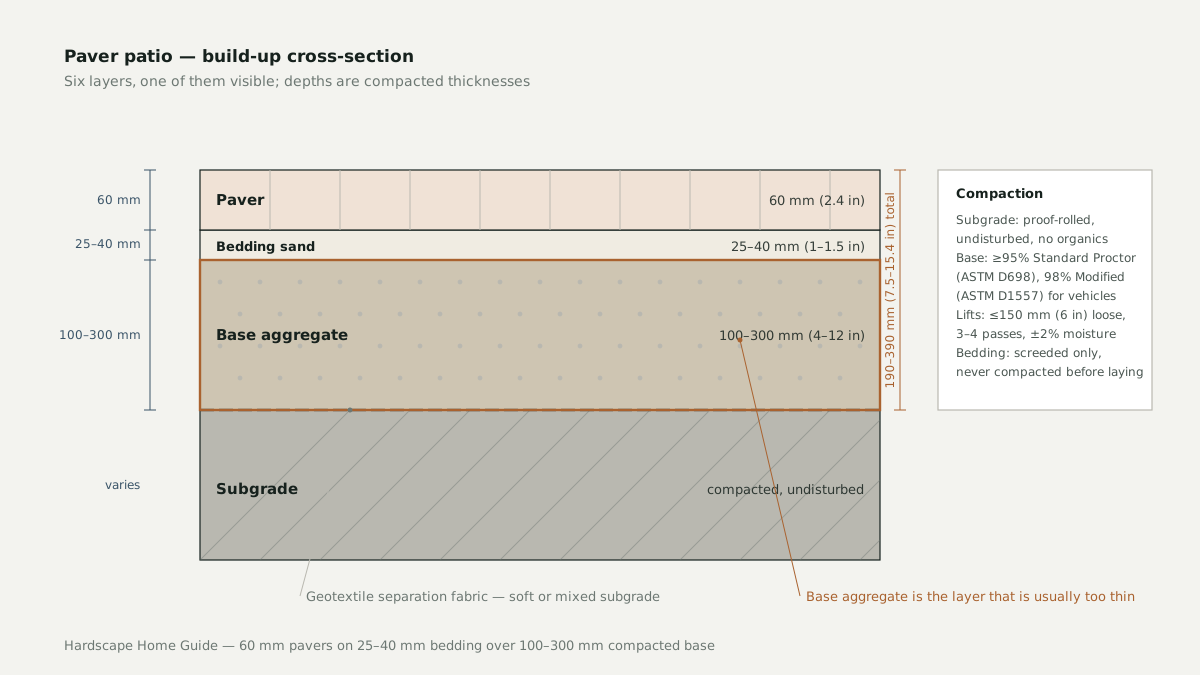
A paver patio is a 60 mm (2.4 in) wearing surface on 180 mm (7 in) of buried material. The pavers are the only layer chosen for looks and the least likely to fail. What decides how long the patio lasts sits below the bedding sand.
Excavation depth is set by the subgrade, not the paver
Paver thickness is fixed at 60 mm (2.4 in); bedding adds 25–40 mm (1–1.5 in). The base is the only layer whose depth really moves, sized by the load and how the soil behaves when wet: 100 mm (4 in) of compacted base on clean sand or gravel, 150 mm (6 in) on average soil, 200–250 mm (8–10 in) on heavy clay.
| Subgrade | Compacted base | Total excavation | Why |
|---|---|---|---|
| Clean sand or gravel | 100 mm (4 in) | 190 mm (7.5 in) | Drains well |
| Average loam or mixed fill | 150 mm (6 in) | 240 mm (9.4 in) | The default |
| Expansive clay | 200–250 mm (8–10 in) | 290–350 mm (11.5–14 in) | Moisture movement |
| Frost-susceptible ground | 300 mm (12 in) or more | 390 mm (15.4 in) or more | Frost depth |
Totals assume 60 mm pavers and 25–40 mm of bedding. Frost depth runs from about 1.2 m (4 ft) in Ohio to 2.4 m (8 ft) in parts of Alberta.

Expansive clay: Australia, Texas and parts of New Zealand
Reactive clay does not fail under load; it moves with moisture and takes the base with it. It is common across the Australian capitals, in Texas from Dallas to Houston, and in parts of the Waikato. Excavate to 200–250 mm (8–10 in), lay separation geotextile, and get water away. AS 2870 classifies reactive sites in Australia, and a Class H or E site needs the deeper base.
Frost heave: Canada and the northern US
Freezing water in the subgrade lifts the patio. A flexible paver assembly copes only if the base stays free-draining and the frost zone stays out of the bedding: 300 mm (12 in) of compacted base as a floor, more where frost depth is greater, and no fines in the stone. Specify the severe-weather freeze-thaw class of ASTM C936, or its CSA A231.1 equivalent.
Coastal salt exposure: New Zealand and Australian coastal suburbs
Salt spray deposits chloride that water carries into the paver, where crystallisation breaks a porous unit down from the inside. Efflorescence is the early warning. Specify absorption under 5%, the ASTM C936 limit and the figure AS/NZS 4456 testing produces.
Installed, a paver patio runs about $10–$22 per square foot ($108–$237/m²) in 2026 US markets — roughly AUD 110–240/m² in Australia and NZD 120–260/m² in New Zealand. Costs are regional and dated; treat the range as a sanity check on a bid.
Geotextile: when separation fabric earns its cost
A separation geotextile is a non-woven fabric, usually 100–200 g/m², rolled over the compacted subgrade. It stops base stone punching into soft ground and fines pumping up into the drainage voids. It earns its cost on soft clay, silt, mixed fill and high water tables: $0.30–$0.60 per square foot ($3–6/m²). On clean sand or gravel there is nothing to separate.
It is not structural and not a drainage layer. It does not justify a thinner base or rescue a subgrade that was never compacted; on soft ground the structural product is a biaxial geogrid.
Base aggregate: angular, graded, and compacted in lifts
Angular versus rounded
Crushed stone has fractured faces that lock together under a plate compactor, so the layer acts as a stiff plate. Rounded river gravel has no interlock: the particles roll past each other and the layer keeps moving however long it is worked. Specify a dense-graded crushed aggregate, 20 mm (¾ in) nominal maximum, with sizes from fines to top size — a DOT base course to ASTM D2940 or AASHTO M 147, trade shorthand “¾ in minus”. Open-graded stone will not compact stiff; it belongs in a permeable build-up.
Lifts, not total depth
A plate compactor reaches about 100 mm (4 in) deep. Place 300 mm (12 in) in one pass and the top 100 mm tests dense while the bottom stays loose — the mechanism behind most sunken patios. Maximum 150 mm (6 in) loose per lift; 100 mm (4 in) loose, compacting to about 75 mm (3 in), is more reliable. Water each lift to within ±2% of optimum moisture and make three to four passes. Patios target ≥95% of Standard Proctor density (ASTM D698); anything taking a vehicle targets 98% of Modified Proctor (ASTM D1557) and a deeper base, which the driveway paver guide covers.
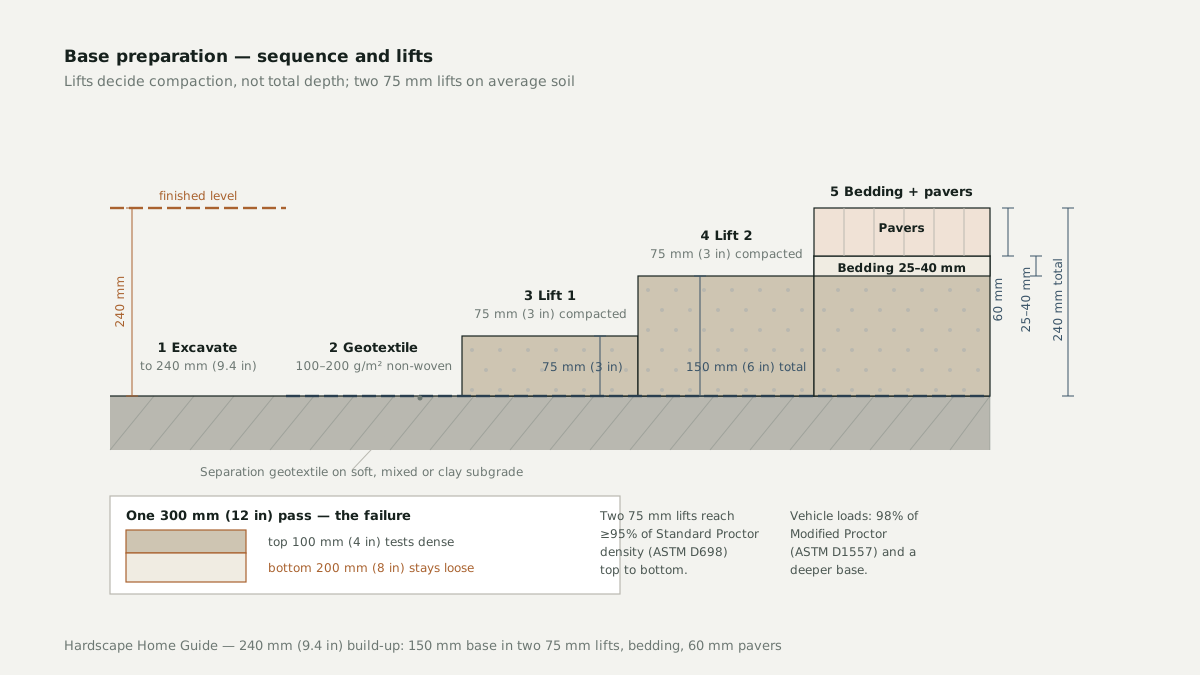
On a 150 mm base that means two lifts, not one — 30–40% of the labour and none of the visible result.
Bedding sand: 25–40 mm, and it is not a levelling compound
Bedding sand is a screeded layer, 25 mm (1 in) normally and 40 mm (1.5 in) at the outside. Its only job is to give the pavers a uniform bed so every unit bears on the base. Use a coarse, washed concrete sand to ASTM C33 or C144; fine mason’s sand compacts to something close to impermeable and holds water against the base.
Bedding is screeded, never compacted before the pavers go on — compaction happens through the pavers, after laying. The failure we see most often is a base corrected with sand; the second is bedding compacted with a plate first.
The pavers: 60 mm is the residential standard
60 mm (2.4 in) is the patio standard. 80 mm (3.15 in) units are for driveways and vehicle loads; 40 mm (1.6 in) units are caps and overlays, not a patio field.
ASTM C936, for solid concrete interlocking paving units, requires at least 8,000 psi (55 MPa) average compressive strength and no more than 5% average absorption, with a freeze-thaw class for severe climates. Canada works to CSA A231.1 and A231.2; Australia and New Zealand test to AS/NZS 4456 and design to AS 3727.1.
Joints run 2–5 mm (1/16–3/16 in) sawn and up to 6 mm (¼ in) tumbled; a tight field tents in summer. Our guide to Belgard pavers covers the regional product ranges, and stamped concrete avoids joint sand but gives up the repairability that is the whole argument for pavers.
Edge restraint: two ways to lock the field
A field is held together by friction between the units through the joint sand, and by a rigid edge. Remove the edge and the field creeps outward, the perimeter joints open first, and the sand washes out.
Concrete haunch. A stiff mix, typically 20–25 MPa (3,000–3,500 psi), against the outside of the edge course, at least 100 mm (4 in) wide and 100 mm (4 in) thick, bearing on undisturbed soil or compacted base. Strongest, and standard for anything carrying load.
Spiked edge restraint. An aluminium or plastic L-section on steel spikes at 300–450 mm (12–18 in) centres. Adequate for a patio if the spikes are 200–300 mm (8–12 in) long and reach undisturbed subgrade — spikes into base or bedding hold nothing.
AS 3727.1 requires edge restraint on flexible paving, and it is the line item most likely to be missing from a quote.
Joint sand: standard or polymeric
Joint sand is the third part of the restraint system: it fills the gap between units and locks them against each other. Standard sand is washed, kiln-dried sand to ASTM C144, swept into dry joints and compacted in. Polymeric sand adds a binder that sets firm after activation — better against washout, ants and weeds, but it must be installed dry and activated with a fine mist, not a soaking.
| Property | Standard sand | Polymeric sand |
|---|---|---|
| Material cost | $0.10–$0.20/ft² ($1–2/m²) | $0.30–$0.80/ft² ($3–9/m²) |
| Life before topping up | 2–3 years | 5–8 years |
| Washout in heavy rain | Common on a low fall | Rare once cured |
| Relaying a settled area | Straightforward | Harder; break out the joint |
Neither substitutes for edge restraint: a polymeric joint will not stop a field without a rigid edge from spreading.
Top up joint sand every two to three years, and never pressure-wash at high setting — it strips the sand doing the work.
Drainage and slope
A patio must fall away from the building. The working range is 1–2% — 1:100 to 1:50, or about ⅛ to ¼ in per foot. Below 1% water ponds on the surface; above about 3% tables and chairs sit visibly unsteady.
Even a well-laid patio passes 10–20% of rainfall through the joints into the bedding and base, so the base must drain and the subgrade must slope. Aggregate in an undrained bowl of subgrade is how patios fail in wet climates. Against the house, keep the finished surface at least 150 mm (6 in) below the damp-proof course; the IRC requires grade to fall 6 in within the first 10 ft of the foundation.
A permeable build-up is the alternative: open-graded stone with no fines — ASTM No. 57 or equivalent — forms a reservoir under the pavers, draining through the joints to a perforated subdrain. It suits clay, basements and restricted runoff, and costs 20–30% more.
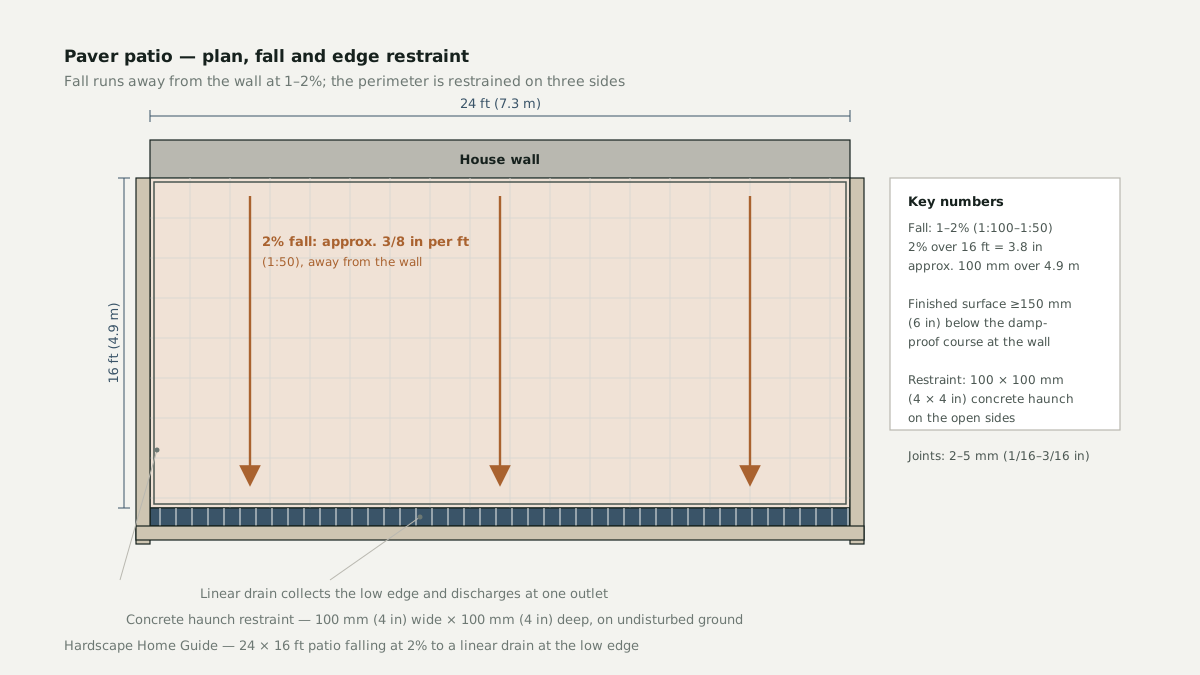
BRANZ guidance in New Zealand and AS 3727.1 in Australia require the same 1–2% fall. A fall that is marginal in Arizona will pond in Auckland once the joint sand has weathered.
When a layer is skipped, and how to repair a settled area
Almost every failed paver patio traces back to one omitted layer.
| What was skipped | Symptom | When it shows | The fix |
|---|---|---|---|
| Base depth | Shallow settlement | 2–4 seasons | Relay on a deeper base |
| Compaction in lifts | Pavers rock; joints open in bands | 1–3 seasons | Re-compact in lifts |
| Geotextile on soft clay | Settlement; fines in the joints | 3–5 seasons | Rebuild with separation fabric |
| Bedding sand grade | Water sits at the joints after rain | First wet season | Re-screed in concrete sand |
| Edge restraint | Perimeter joints open first | 2–3 seasons | Install restraint |
| Fall away from the house | Water against the wall; algae | Immediately | Relay to a 1–2% fall |
Symptoms overlap; investigate the base and drainage first.
Relaying, not patching
A settled area is a base fault, so top-dressing with sand or gluing down the loose units treats the symptom. The repair is a relay, cut out along the nearest joint lines: lift the pavers and stack them in order, scrape back the bedding, remove the base to at least 50 mm (2 in) below the failed zone — deeper if the subgrade has softened — then re-compact, rebuild in 100 mm (4 in) loose lifts, re-screed, relay to the original level, restore the restraint, and re-sand.
Where the subgrade cannot be made stable — deep fill, a high water table, a clay that will not drain — a concrete patio on a properly designed slab is the more honest choice. Everywhere else, the buried layers are cheap relative to the labour around them. Ask for the base depth in writing, how many lifts, whether the edge restraint is included, and how the patio falls.
Frequently asked questions
How deep do you dig for a paver patio?
Total excavation is the paver plus bedding plus base. For a residential patio that is 190 mm (7.5 in) on clean sand or gravel, 240 mm (9.4 in) on average soil, and 290–350 mm (11.5–14 in) on expansive clay. Add depth where frost penetrates deeper.
How thick should the base be under patio pavers?
100 mm (4 in) of compacted base on clean, well-drained sand or gravel, 150 mm (6 in) on average soil, 200–250 mm (8–10 in) on heavy clay, and 300 mm (12 in) or more where frost is a factor. It must go in lifts of no more than 150 mm (6 in) loose, compacted to at least 95% of Standard Proctor density.
Is polymeric sand better than regular joint sand?
Polymeric sand lasts 5–8 years against 2–3 for standard sand and resists washout, ants and weeds, but it costs $0.30–$0.80/ft² against $0.10–$0.20/ft² and must be installed dry, then activated with a fine mist. It also makes relaying a settled area harder because the cured joint has to be broken out.
Why do my pavers sink or shift?
Almost always a base fault: too thin for the subgrade, placed in one thick layer instead of compacted lifts, or missing edge restraint. Broad shallow settlement points at base depth, pavers rocking underfoot points at compaction, and joints opening at the perimeter points at restraint.
Sources and references
- Interlocking Concrete Pavement Institute — residential and pedestrian paving guidance
- ASTM International — C936, C33, C144, D698 and D1557 standards
- CSA Group — CSA A231.1 and A231.2 concrete paver standards
- Standards Australia — AS 3727.1 residential paving and AS 2870 reactive clay sites
- BRANZ — paving and drainage guidance for New Zealand conditions
