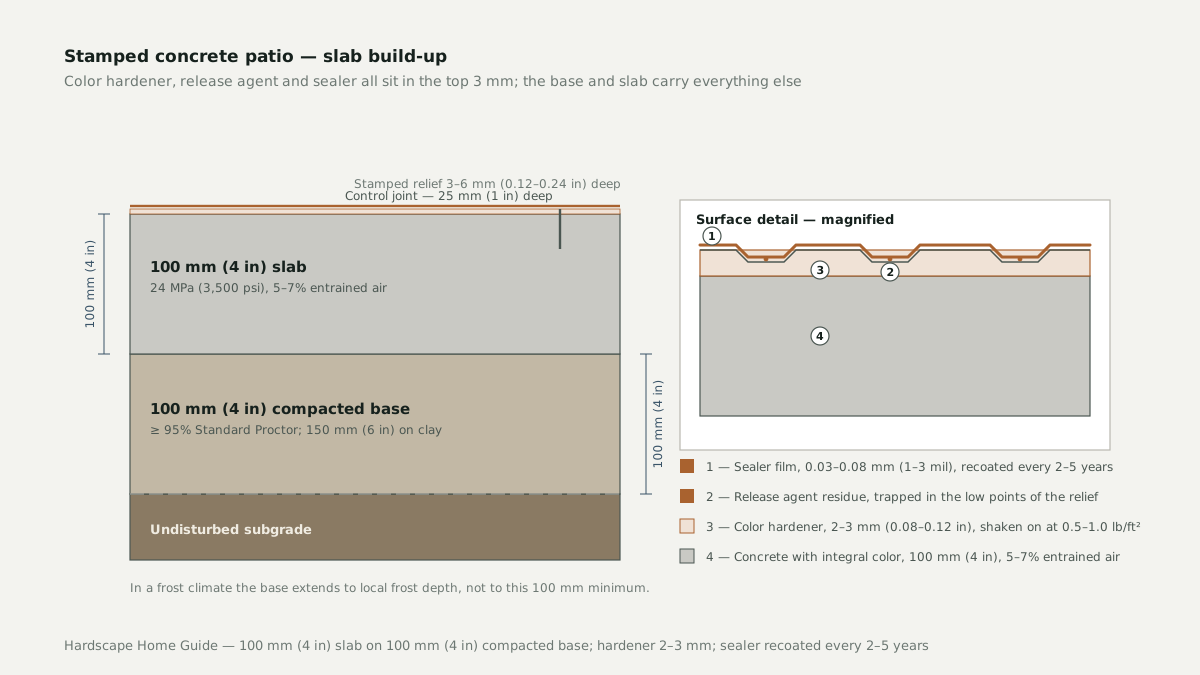
Stamped concrete is the cheapest way to buy a stone look for a patio, and it is the least forgiving surface to get wrong. The stamping is the part visitors notice; the base, the slab thickness, the joint layout and the sealer are the parts that decide whether the patio still reads as stone in ten years.
What stamping actually does
Stamping is a surface operation on a slab that is still plastic, worked in a narrow window — usually 45 minutes to two hours after the bleed water disappears. Three products go on inside that window, and they do three different jobs.
Integral color is pigment batched into the concrete at the plant. It colors the whole 100 mm (4 in) section, so a chip shows the same tone underneath. It is the most expensive of the three, because pigment is charged per cubic meter.
Color hardener — dry-shake or shake-on color — is broadcast by hand over the wet surface at roughly 0.5–1.0 lb/ft² (2.4–4.9 kg/m²), then floated in. It builds a 2–3 mm (0.08–0.12 in) layer of denser, more richly colored mortar. Almost all the visual depth comes from that layer, and that layer is where the most common failure in the trade starts.
Release agent is not color, even when it is colored — it stops the mats sticking. Colored release agents (charcoal, buff, walnut) leave residue in the low points of the texture, which produces the antique, shadowed look. It is a residue, not a coating: it is washed back after curing, and what survives under the sealer is what you keep.
Two tools do the shaping. A stamp mat is a rigid polyurethane plate carrying a pattern — ashlar slate, cobble, plank — and impresses both the stone outline and a texture. A texture skin carries texture only, no stone outline. A patio built with texture skins alone looks like textured concrete, not stone.
What a stamped patio costs
| Finish | Per ft² | Per m² | 300 ft² (28 m²) patio |
|---|---|---|---|
| Broom-finished concrete, no color | $6–$10 | $65–$108 | $1,800–$3,000 |
| Integral color, no stamp | $8–$12 | $86–$129 | $2,400–$3,600 |
| Single stamp, integral color | $12–$15 | $129–$161 | $3,600–$4,500 |
| Color hardener and release agent, multi-pattern | $15–$18 | $161–$194 | $4,500–$5,400 |
| Stamped with borders and banding | $18–$25 | $194–$269 | $5,400–$7,500 |
Costs are regional and dated. They assume a truck can reach the pour and a crew can stamp the area in one window; narrow access, a slope, or breaking out an existing slab adds 15–30%.
Canadian quotes land near the top of the US range — they are written in Canadian dollars and priced with a frost-depth base. Australian and New Zealand work runs 20–35% above the US figure.
The base and slab govern everything
Nobody photographs the base. It is also the only layer that cannot be fixed later without demolishing the patio.
Stamped work is usually placed at 100 mm (4 in) for foot traffic, which ACI 302.1R treats as a floor rather than a target: a minimum 100 mm slab, a compacted granular base, and a joint layout designed before the pour.
Strength follows the climate. In Canada, CSA A23.1 exposure class C-2 — freeze–thaw with de-icing chemicals — typically calls 32 MPa (4,600 psi) with 5–7% entrained air and a batch ticket to prove it. Air content is the first item dropped from a decorative pour, because entrained air slightly reduces how creamy the surface looks under a float.

| Element | Specification | Notes |
|---|---|---|
| Slab thickness | 100 mm (4 in) | 125–150 mm (5–6 in) for vehicles or a ride-on mower |
| Concrete strength | 24 MPa (3,500 psi) | 28–32 MPa (4,000–4,600 psi) where the slab freezes |
| Air entrainment | 5–7% | Mandatory in freeze–thaw; verify on the batch ticket |
| Base | 100 mm (4 in) compacted granular | 150 mm (6 in) on clay or silt; deeper to local frost depth |
| Base compaction | ≥ 95% Standard Proctor | ASTM D698, or AS 1289.5.1.1 in Australia |
| Reinforcement | Welded mesh or macro fiber | Rebar where the subgrade is soft |
| Control joints | 2.4–3.6 m (8–12 ft) apart | ACI 302.1R: 24–36 × slab thickness, panels roughly square |
Air entrainment is the cheapest insurance on the sheet and the first item cut when a bid comes in low. Ask to see the batch ticket.
Base depth is where frost changes the answer. A 100 mm base is adequate in a mild climate and meaningless where frost penetrates 1.2 m (4 ft). On expansive clay — much of Texas, inland Australia, parts of New Zealand — the subgrade needs an engineered design and a classification under AS 2870.
Joints have to hide inside the pattern
Concrete cracks. That is a property, not a defect. The joint layout decides where it cracks, and on stamped work it has a second job: it must not slice through the pattern in a way the eye reads as a mistake.
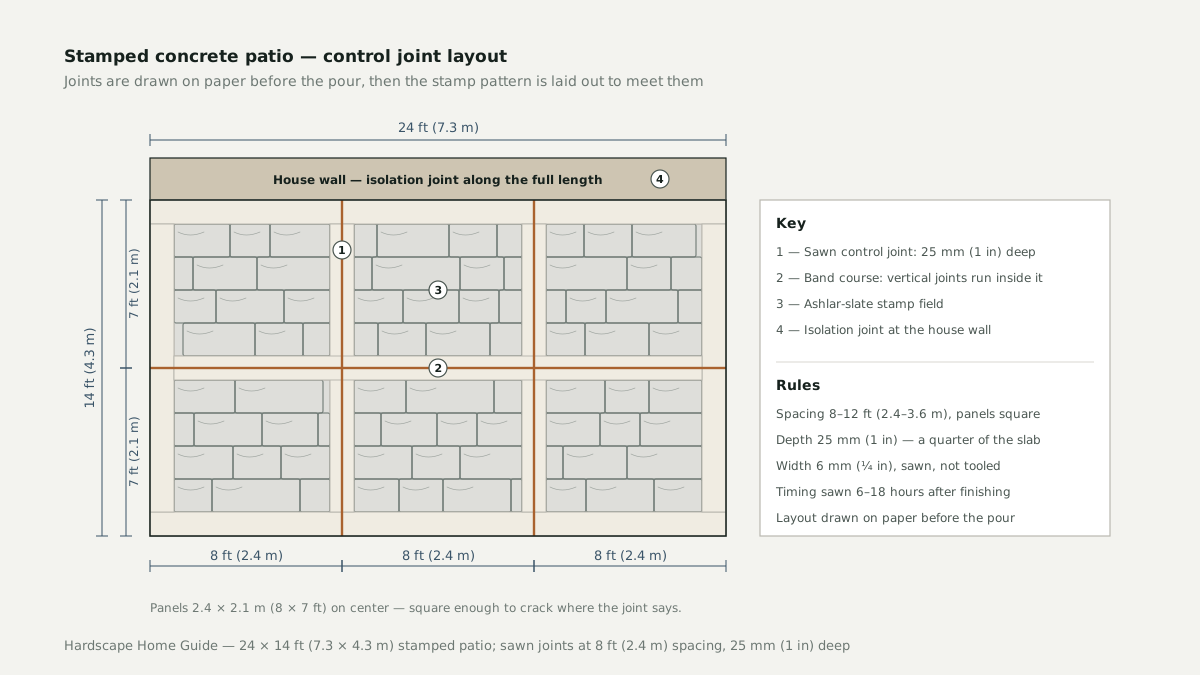
- Spacing. Panels between 2.4 m and 3.6 m (8–12 ft), roughly square, never more than about 1.5:1 — ACI 302.1R’s 24–36 × slab thickness rule applied to a 100 mm slab.
- Depth. A quarter of the slab, so 25 mm (1 in) on a 100 mm slab, and 6 mm (¼ in) wide. A score line that only scratches the surface does not create a plane of weakness.
- Timing. Sawn within about 6–18 hours, once the concrete is hard enough not to ravel but before shrinkage starts in earnest.
Then the part that separates a good crew from a cheap one: the joints are drawn on a plan before the pour, and the pattern is laid out to meet them. Horizontal joints run along a course line in ashlar or cobble, where the joint is invisible because a joint between courses is already there. Vertical joints cannot hide in a random pattern, so they go where a band or border already sits.
Sealers and the re-sealing clock
The sealer holds the release agent in the texture, slows water entering the surface, and makes the patio cleanable. It is also the recurring cost that never appears in a stamped-versus-pavers comparison.
| Sealer | Finish | First coat | Re-seal interval |
|---|---|---|---|
| Solvent-based acrylic | Gloss | 28 days | Every 2–3 years |
| Water-based acrylic | Satin | 28 days | Every 2–3 years |
| Aliphatic polyurethane | Gloss or satin | 28 days | Every 3–5 years |
| Penetrating silane or siloxane | Matte, no film | 28 days | Every 5–10 years |
ASTM C1315 covers film-forming curing and sealing compounds; ASTM C309 covers curing compounds alone. In Australia and New Zealand, high UV shortens an acrylic film’s life.
The first coat goes on at about 28 days, once the slab has dried through; sealing earlier traps moisture under the film and produces a cloudy finish that has to be stripped. Wet-look films are slippery when wet, so on a shaded patio or a pool deck specify a non-slip additive.
The six ways stamped work fails
Six failures account for nearly all the complaints. Five show up within three years; the sixth takes a decade.
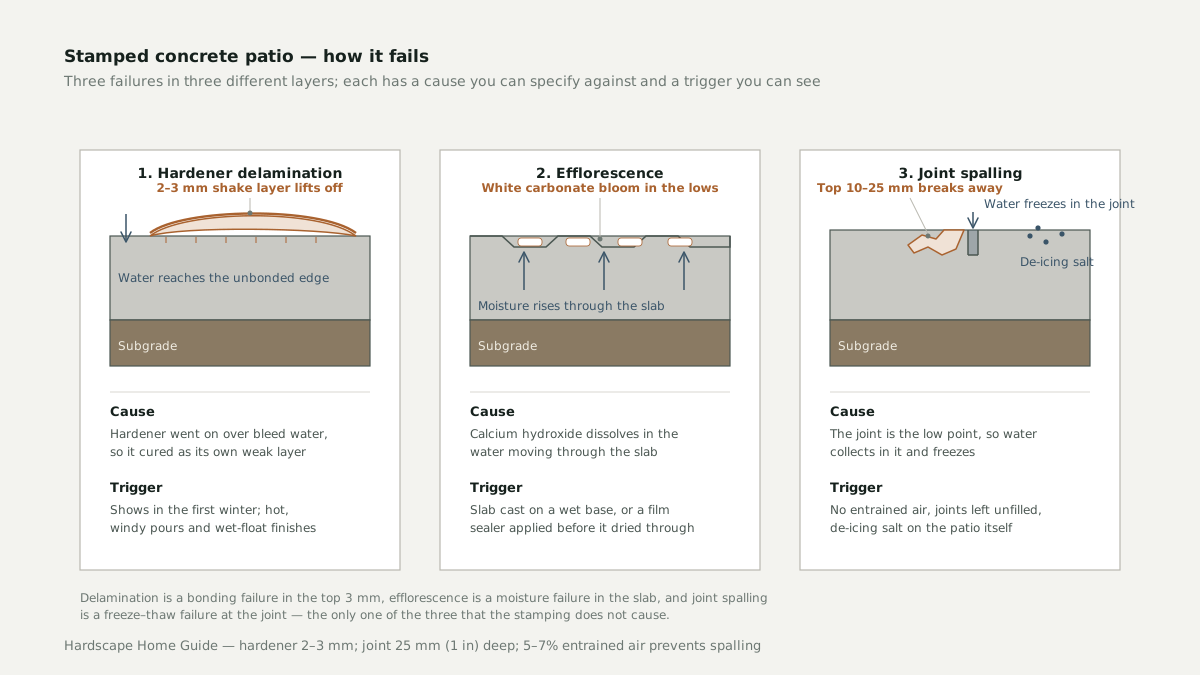
- Delamination of the color hardener. The 2–3 mm shake layer lifts off as a skin, usually in sheets the size of a hand. Cause: the hardener went on over bleed water, or over a surface already sealed by a wet float, so it cured as its own weak layer instead of bonding. Trigger: the first winter.
- Efflorescence. A white, chalky bloom in the texture lows, worst in shade and after rain. Cause: calcium hydroxide from the cement dissolves in water moving through the slab and carbonates at the surface. Trigger: a slab cast on a wet base, or a film sealer applied before the slab dried through.
- Joint spalling. The top 10–25 mm (0.4–1 in) breaks away along a control joint, leaving a ragged edge. Cause: the joint is the lowest point on the patio, so water collects in it and freezes. Trigger: no entrained air, joints left unfilled, de-icing salt. This is the failure most often blamed on the stamping and least often caused by it.
- Color mottling. Patchy tone that reads as a bad dye job. Cause: hardener broadcast unevenly, release agent worked into some areas and not others, or cure blankets over a surface still drying. Trigger: a crew without much large-area stamping behind it, or a pour split across two days.
- Freeze–thaw scaling. The surface flakes off in 1–5 mm (0.04–0.2 in) layers and exposes the aggregate. Cause: no entrained air, plus a surface over-floated and over-wetted during finishing, leaving weak, high-water paste at the top. Trigger: repeated freeze–thaw with water standing on the surface.
- Salt damage. In Canada and the northern US, de-icing salt does more damage than frost alone — magnesium and calcium chloride attack the cement paste chemically as well as by freezing. Trigger: salt on the patio itself, or tracked on from a driveway. Sand is the practical answer.
Where stamped concrete is the wrong choice
Stamped concrete is a poor decision in more situations than the trade admits.
- Expansive clay or a high water table. Subgrade movement cracks a slab, and a crack in stamped concrete cannot be repaired invisibly. This is where pavers win outright — a paver that lifts can be re-laid in an afternoon.
- Heavy winter salt. An entry pad salted every year for twenty years is a poor bet in any concrete, and a worse one where the decorated layer is the layer that fails.
- Anything you may need to dig into. Drainage, irrigation, a gas line, a future addition. A trench cut through a stamped slab and patched is visible forever; in a paver patio it is invisible by evening.
- Tight or sloping access. A truck has to reach the pour and the crew has to stamp the whole area inside one window. Long carries and steep grades push cost up and quality down.
- A budget that will not fund re-sealing. A patio never re-sealed after the first coat loses its color depth within five years and looks like grey concrete with grooves in it. If the sealer will not be maintained, spend the money on a plain colored slab instead.
- A very large unbroken area. Stamped work reads best at patio scale. Across 185 m² (2,000 ft²) of driveway in one pattern the repetition is obvious, and the cost advantage over pavers on a proper base narrows to nothing.
The honest summary: stamped concrete buys a stone look for roughly two-thirds of what good stone costs, and it rents rather than owns that look — the sealer is the rent. Get the base, the thickness, the air content and the joint layout right and the patio still reads as stone in ten years.
Frequently asked questions
How much does a stamped concrete patio cost?
A single stamp over integrally colored concrete runs about $12–$15/ft² ($129–$161/m²), and multi-pattern work with color hardener and a release agent runs $15–$18/ft² ($161–$194/m²). That puts a 300 ft² (28 m²) patio between roughly $3,600 and $5,400. Borders, banding, narrow access or breaking out an old slab push it toward $18–$25/ft².
How thick should a stamped concrete patio slab be?
100 mm (4 in) over 100 mm (4 in) of compacted granular base is the minimum for foot traffic, at 24 MPa (3,500 psi). Go to 125–150 mm (5–6 in) with reinforcement if a vehicle or a ride-on mower will ever be on it. Where the slab freezes, use 28–32 MPa (4,000–4,600 psi) concrete with 5–7% entrained air.
How often does stamped concrete need to be resealed?
A solvent or water-based acrylic film needs re-coating every 2–3 years, an aliphatic polyurethane every 3–5 years, and a penetrating silane or siloxane every 5–10 years. The first coat goes on at about 28 days, once the slab has dried through. In high-UV climates such as Australia and New Zealand, expect the short end of each interval.
Why is the color peeling off my stamped concrete?
That is delamination of the color hardener, the 2–3 mm (0.08–0.12 in) shake-on layer. It happens when the hardener is broadcast over bleed water or over a surface already sealed by a wet float, so it cures as its own weak layer instead of bonding to the slab. It usually appears in the first winter and cannot be patched invisibly.
Sources and references
- American Concrete Institute — ACI 302.1R, Guide to Concrete Floor and Slab Construction
- ASTM International — C1315 curing and sealing compounds, C672 scaling resistance
- CSA Group — CSA A23.1, Concrete materials and methods of construction
- Cement Concrete & Aggregates Australia — residential concrete and AS 3727.1 guidance
- Portland Cement Association — decorative concrete technical resources
